The Ultimate Guide On How To Start Web Scraping With Elixir
Suciu Dan on Oct 18 2022
Introduction
Web scraping is the process of extracting data from publicly available sites like forums, social media sites, news sites, e-commerce platforms etc. To give you a sneak peek for what you will build today, this article describes the creation of a web scraper in Elixir.
If the definition of web scraping is still not clear to you, let’s consider saving an image from a site as manual web scraping. If you want to save all the images from a site by hand, based on the site complexity, it might take hours or even days.
You can automate this process by building a web scraper.
Maybe you’re wondering what are some use cases of a web scraper. Here are the common ones:
News Tracking
You can scrape the latest news from your favourite financial news site, run a sentiment analysis algorithm and know in what to invest minutes before the market will start and move
Social Media Insights
You can scrape the comments from your social media pages and analyse what your subscribers are talking about and how they are feeling about your product or service.
Price Monitoring
If your passion is collecting consoles and video games but you don’t want to spend a fortune on the latest PS5, you can make a web scraper that retrieves the eBay listings and sends a notification to you when a cheap console is on the market.
Machine Learning Training
If you want to create a mobile application that can identify the breed of a cat in any picture, you’ll need a lot of training data; instead of saving hundreds of thousands of pictures with cats manually to train the model, you can use a web scraper to do it automatically.
We will build our web scraper in Elixir, a programming language built on top of Erlang, created by José Valim, member of the core Ruby on Rails team. The programming language borrows the Ruby syntax simplicity and combines it with Erlang's ability to build low-latency, distributed, and fault-tolerant systems.
Requirements
Before you write the first line of code, make sure you have Elixir installed on your computer. Download the installer for your operating system and follow the instructions from the Install page.
During the installation, you’ll notice the Erlang programming language is required as well. Keep in mind that Elixir runs in the Erlang VM so you need both.
Getting started
In this article, you will learn how to create a web scraper in Elixir, scrape the products from eBay for PS5 listings and store locally the extracted data (name, url, price).
Inspecting the target
It’s time to inspect the search results on the eBay page and collect some selectors.
Go to ebay.com, enter the term PS5 in the Search input and click the Search Button. Once the search results page is loaded, open the Inspect tool from your browser (right click anywhere on the page and select Inspect).
You need to collect the following selectors:
- Product List Item
- Product URL
- Product name
- Product price
Use the select element tool and search for the product item list (ul) and the product item (li):
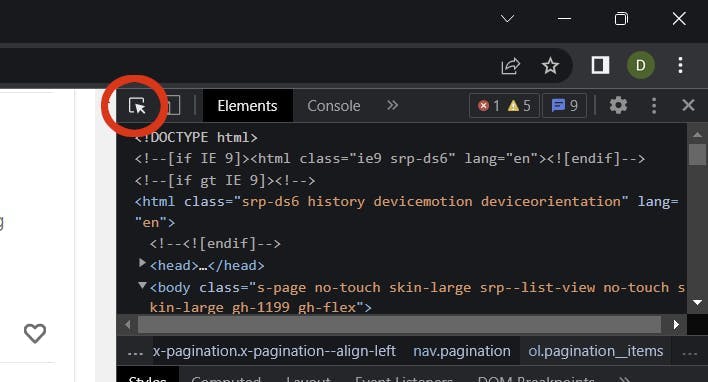
Using these two elements, you can extract the classes needed for the crawler for data extraction:
- .srp-results .s-item the child elements of the products list element (ul)
- .s-item__title span the product title
- .s-item__link the product link
- .s-item__price the product price
Creating the project
Let’s create an Elixir project using the mix command:
mix new elixir_spider --sup
The --sup flag generates an OTP application skeleton including a supervision tree, a needed feature for an application that manages multiple concurrent processes like a crawler.
Creating the temp folder
Change the current directory to the project root:
cd elixir_spider
Create the temp directory:
mkdir temp
We use this directory to store the scraped items.
Adding the dependencies
After the project is created, you need to add the two dependencies:
- Crawly isan application framework for crawling sites and extracting structured data
- Floki is an HTML parser that enables search for nodes using CSS Selectors
Open the mix.exs file and add the dependencies in the deps block:
defp deps do
    [
        {:crawly, "~> 0.14.0"},
        {:floki, "~> 0.33.1"}
    ]
end
Fetch the dependencies by running this command:
mix deps.get
Create the config
Create the config/config.exs file and paste this configuration in it:
import Config

config :crawly,
    closespider_timeout: 10,
    concurrent_requests_per_domain: 8,
    closespider_itemcount: 100,

    middlewares: [
            Crawly.Middlewares.DomainFilter,
            Crawly.Middlewares.UniqueRequest,
            {Crawly.Middlewares.UserAgent, user_agents: ["Mozilla/5.0 (Windows NT 10.0; Win64; x64; rv:105.0) Gecko/20100101 Firefox/105.0"]}
    ],
    pipelines: [
            {Crawly.Pipelines.Validate, fields: [:url, :title, :price]},
            {Crawly.Pipelines.DuplicatesFilter, item_id: :title},
            Crawly.Pipelines.JSONEncoder,
            {Crawly.Pipelines.WriteToFile, extension: "jl", folder: "./temp"}
    ]
General Options
Let’s go through each property and make some sense of it:
- closespider_timeout: integer, the maximum number of seconds the spider will stay open
- concurrent_requests_per_domain: the maximum number of requests that will be made for each scraped domain
- closespider_itemcount: the maximum number of items are passed by the item pipeline
User Agent
By setting the user agent, you improve the scraping results by mimicking a real browser. Sites are not happy with scrapers and try to block any user agents that don’t seem real. You can use a tool like this to get your browser user agent.
WebScrapingAPI rotates the user agent and the IP address with each request and also implements countless evasions to prevent this kind of situation. Your requests will not get blocked and implementing a retry mechanism will give you amazon results.
Pipelines
The pipelines are commands processed from top to bottom and enable the manipulation of the processed items. We use the following pipelines:
- Validate fields (title, price, url): checks if the item has the scraped fields set
- Duplicate filter: checks for duplicate items by title
- JSON Encoder: encodes the structures to JSON object
- Write to File: writes the items to the ./temp folder
Creating the spider
A web crawler, or a spider, is a type of bot that goes through a site, and extracts data using user defined fields through CSS selectors. A crawler can extract all the links from a page and use specific ones (like pagination links) to crawl more data.
It’s time to set the base for the crawler: create the ebay_scraper.ex file in the lib/elixir_spider folder and paste the following code to it:
# lib/elixir_spider/ebay.ex
defmodule EbayScraper do
    use Crawly.Spider

    @impl Crawly.Spider
    def base_url(), do: ""

    @impl Crawly.Spider
    def init() do

    end

    @impl Crawly.Spider
    def parse_item(response) do

    end
 end
This is just the skeleton for the file and it won’t run or return any results. Let’s talk about each function first and then we fill them one by one.
The base_url() function is called once and it returns the base URL for the target website the crawler will scrape; it’s also used to filter external links and prevent the crawler from following them. You don’t want to scrape the entire Internet.
@impl Crawly.Spider
def base_url(), do: "https://www.ebay.com/"
The init() function is called once and is used to initialise the default state for the crawler; in this case, the function returns the start_url from where the scraping will begin.
Replace your blank function with this one:
@impl Crawly.Spider
def init() do
    [start_urls: ["https://www.ebay.com/sch/i.html?_nkw=ps5"]]
end
All the data extract magic happens in the parse_item(). This function is called for each scraped URL. Within this function, we use the Floki HTML parser to extract the fields we need: title, url and price.
The function will look like this:
@impl Crawly.Spider
def parse_item(response) do
    # Parse response body to document
    {:ok, document} = Floki.parse_document(response.body)

    # Create item (for pages where items exists)
    items =
        document
        |> Floki.find(".srp-results .s-item")
        |> Enum.map(fn x ->
         %{
           title: Floki.find(x, ".s-item__title span") |> Floki.text(),
           price: Floki.find(x, ".s-item__price") |> Floki.text(),
           url: Floki.find(x, ".s-item__link") |> Floki.attribute("href") |> Floki.text(),
         }
    end)

    %{items: items}
end
As you might have noticed, we’re using the classes we found in the Getting Started - Inspecting the target section to extract the data we need from the DOM elements.
Running the spider
It’s time to test the code and make sure it works. From the project root directory, run this command:
iex -S mix run -e "Crawly.Engine.start_spider(EbayScraper)"
If you’re using PowerShell, make sure you replace iex with iex.bat otherwise you will get an error for the non-existent -S parameter. Use this command for PowerShell:
iex.bat -S mix run -e "Crawly.Engine.start_spider(EbayScraper)"
Checking the results
Open the ./temp folder and check the .jl file. You should see a text file containing a list of JSON objects, one per line. Each object contains the information we needed from the eBay products list: title, price and URL.
Here’s how the product object should look like:
{"url":"https://www.ebay.com/itm/204096893295?epid=19040936896&hash=item2f851f716f:g:3G8AAOSwNslhoSZW&amdata=enc%3AAQAHAAAA0Nq2ODU0vEdnTBtnKgiVKIcOMvqJDPem%2BrNHrG4nsY9c3Ny1bzsybI0zClPHX1w4URLWSfXWX%2FeKXpdgpOe%2BF8IO%2FCh77%2FycTnMxDQNr5JfvTQZTF4%2Fu450uJ3RC7c%2B9ze0JHQ%2BWrbWP4yvDJnsTTWmjSONi2Cw71QMP6BnpfHBkn2mNzJ7j3Y1%2FSTIqcZ%2F8akkVNhUT0SQN7%2FBD38ue9kiUNDw9YDTUI1PhY14VbXB6ZMWZkN4hCt6gCDCl5mM7ZRpfYiDaVjaWVCbxUIm3rIg%3D%7Ctkp%3ABFBMwpvFwvRg","title":"PS5 Sony PlayStation 5 Console Disc Version! US VERSION!","price":"$669.99"}Improve the spider
We retrieved all the products from the first products list page but this is not enough. It’s time to implement pagination and let the crawler extract all the available products.
Let’s change the parse_item() function and add a new block that creates a requests struct with the next pagination link. Add this code after the items code:
# Extract the next page link and convert it to a request
requests =
  document
  |> Floki.find(".s-pagination a.pagination__next")
  |> Floki.attribute("href")
  |> Crawly.Utils.build_absolute_urls(response.request_url)
  |> Crawly.Utils.requests_from_urls()
Update the return statement from the parse_item() function to include the next requests as well. The struct will look like this:
%{
  :requests => requests,
  :items => items
}
Run the crawler again but this time prepare a coffee. Scraping all the pages for the PS5 listings will take some minutes.
After the crawler finishes its duty, check the ./temp folder for the scraped results. You successfully scraped eBay for PS5 consoles and have a list with their prices. You can extend this crawler to scrape any other products.
Conclusion
In this article you learned what a web scraper is, what use cases these crawlers have, how to use already made libraries to set up a scraper using Elixir in minutes, and how to run and extract the actual data.
If you felt like this was a lot of work, I want to give you some not so good news: we just scratched the surface. Running this scraper for a long time will start and cause you more issues than you can think of.
eBay will detect your activity and mark it suspicious; the crawler will start to get Captcha patches; you will have to extend the crawler functionality to solve captchas
The detection systems from eBay might flag your IP address and block you from accessing the website; you will have to get a proxy pool and rotate the IP addresses with each request.
Is your head spinning already? Let’s talk about one more issue: the user agent. You need to build a large database with user agents and rotate that value with each request. Detections system block scrapers based on the IP Address and User Agent.
If you want to focus more on the business side and invest your time in data extraction instead of solving the detection issues, using a scraper as a service is a better choice. A solution like WebScrapingAPI fixes all the problems presented above and a bunch more.
News and updates
Stay up-to-date with the latest web scraping guides and news by subscribing to our newsletter.
We care about the protection of your data. Read our Privacy Policy.

Related articles

Explore the in-depth comparison between Scrapy and Selenium for web scraping. From large-scale data acquisition to handling dynamic content, discover the pros, cons, and unique features of each. Learn how to choose the best framework based on your project's needs and scale.

Learn how to scrape dynamic JavaScript-rendered websites using Scrapy and Splash. From installation to writing a spider, handling pagination, and managing Splash responses, this comprehensive guide offers step-by-step instructions for beginners and experts alike.


The definition and uses of online job scraping. Advantages and disadvantages of job scraping along with strategies and potential risks.
