How to Scrape YouTube like a Pro: A Comprehensive Guide
Raluca Penciuc on Feb 20 2023
Are you in need of data from a website, but the available APIs just aren't cutting it? Web scraping is the answer you've been looking for. With web scraping, you can extract data from a website more comprehensively and flexibly.
In this article, we'll delve into the world of web scraping by taking a closer look at how to scrape YouTube, one of the most popular video-sharing platforms. While YouTube does provide an API for accessing data, web scraping can offer a greater range of options for extracting data from YouTube channels.
We'll start by setting up a development environment and covering the prerequisites for web scraping, then move on to the actual process of how to scrape YouTube. Along the way, we'll provide tips for improving your web scraping skills and discuss why using a professional scraper may be a better choice than building your own.
By the end of this article, you'll be equipped with the knowledge and skills to effectively scrape data from YouTube like a pro!
Prerequisites
First things first, you'll need to make sure you have Node.js installed on your machine. If you don't already have it, head over to the official Node.js website and follow the instructions for your specific operating system. It's important to note that you should download the Long Term Support (LTS) version to ensure that you have a stable and supported version.
Next, you'll need to install the Node.js Package Manager (NPM). This should come automatically with your installation of Node.js, but it's always good to double-check.
In terms of your coding environment, feel free to use whatever IDE you prefer. I'll use Visual Studio Code in this tutorial because it's flexible and easy to use, but any IDE will do. Simply create a new folder for your project and open a terminal. Run the following command to set up a new Node.js project:
npm init -y
This will create a default package.json file for your project. You can modify this file at any time to suit your needs.
Now it's time to install TypeScript and the type definitions for Node.js. TypeScript is a popular choice among the JavaScript community because of its optional static typing, which helps prevent type errors in your code. To install it, run the following command:
npm install typescript @types/node --save-dev
To verify that the installation was successful, you can run the following command:
npx tsc --version
Finally, you'll need to create a tsconfig.json configuration file in the root of your project directory. This file defines the compiler options for your project. If you'd like to learn more about this file and its properties, check out the official TypeScript documentation.
Alternatively, you can copy and paste the following code into your tsconfig.json file:
{

   "compilerOptions": {

       "module": "commonjs",

       "esModuleInterop": true,

       "target": "es2017",

       "moduleResolution": "node",

       "sourceMap": true,

       "outDir": "dist"

   },

   "lib": ["es2015"]

}
For the scraping process, I’ll be using Puppeteer, a headless browser library for Node.js that allows you to control a web browser and interact with websites programmatically. To install Puppeteer, run the following command:
npm install puppeteer
Extracting the data
For this guide, I’ll be scraping a YouTube channel with DevOps-related tutorials: https://www.youtube.com/@TechWorldwithNana/videos. The data that I’m looking at in particular is:
- the avatar of the channel
- the name of the channel
- the handle of the channel
- the number of subscribers of the channel
- the titles of all the videos
- the number of views of all the videos
- the thumbnail of all the videos
- the URL of all the videos
I’ll include screenshots for each section, and I’ll rely on CSS selectors to locate the data in the DOM. This is the most simple and straightforward method unless the target website is known for having an unstable DOM structure.
If you’re new to CSS selectors, check out this comprehensive cheat sheet that will get you started in no time.
Let’s begin by creating a src folder and the index.ts file where we will write the code. Now let’s simply open a browser and navigate to the target URL:
import puppeteer from 'puppeteer';

async function scrapeChannelData(channelUrl: string): Promise<any> {

    // Launch Puppeteer

    const browser = await puppeteer.launch({

        headless: false,

    	  args: ['--start-maximized'],

    	  defaultViewport: null

    });

    // Create a new page and navigate to the channel URL

    const page = await browser.newPage();

    await page.goto(channelUrl);

    // Close the browser

    await browser.close();

}

scrapeChannelData("https://www.youtube.com/@TechWorldwithNana/videos");
For visual debugging purposes I’ll open the browser in non-headless mode. If you intend to extend your use case at a large scale, I recommend you check out the headless mode.
To run the script you have to compile it first, and then execute the generated Javascript file. To make things easier, we can define a script in the package.json file that handles both of these steps for us. Simply edit the scripts section of your package.json file like this:
"scripts": {

    "test": "npx tsc && node dist/index.js"

},
Now, all you have to do to run your code is run the following command:
npm run test
Since the first run, we notice a first problem: the full-screen cookie consent dialogue that prevents us from accessing the data.
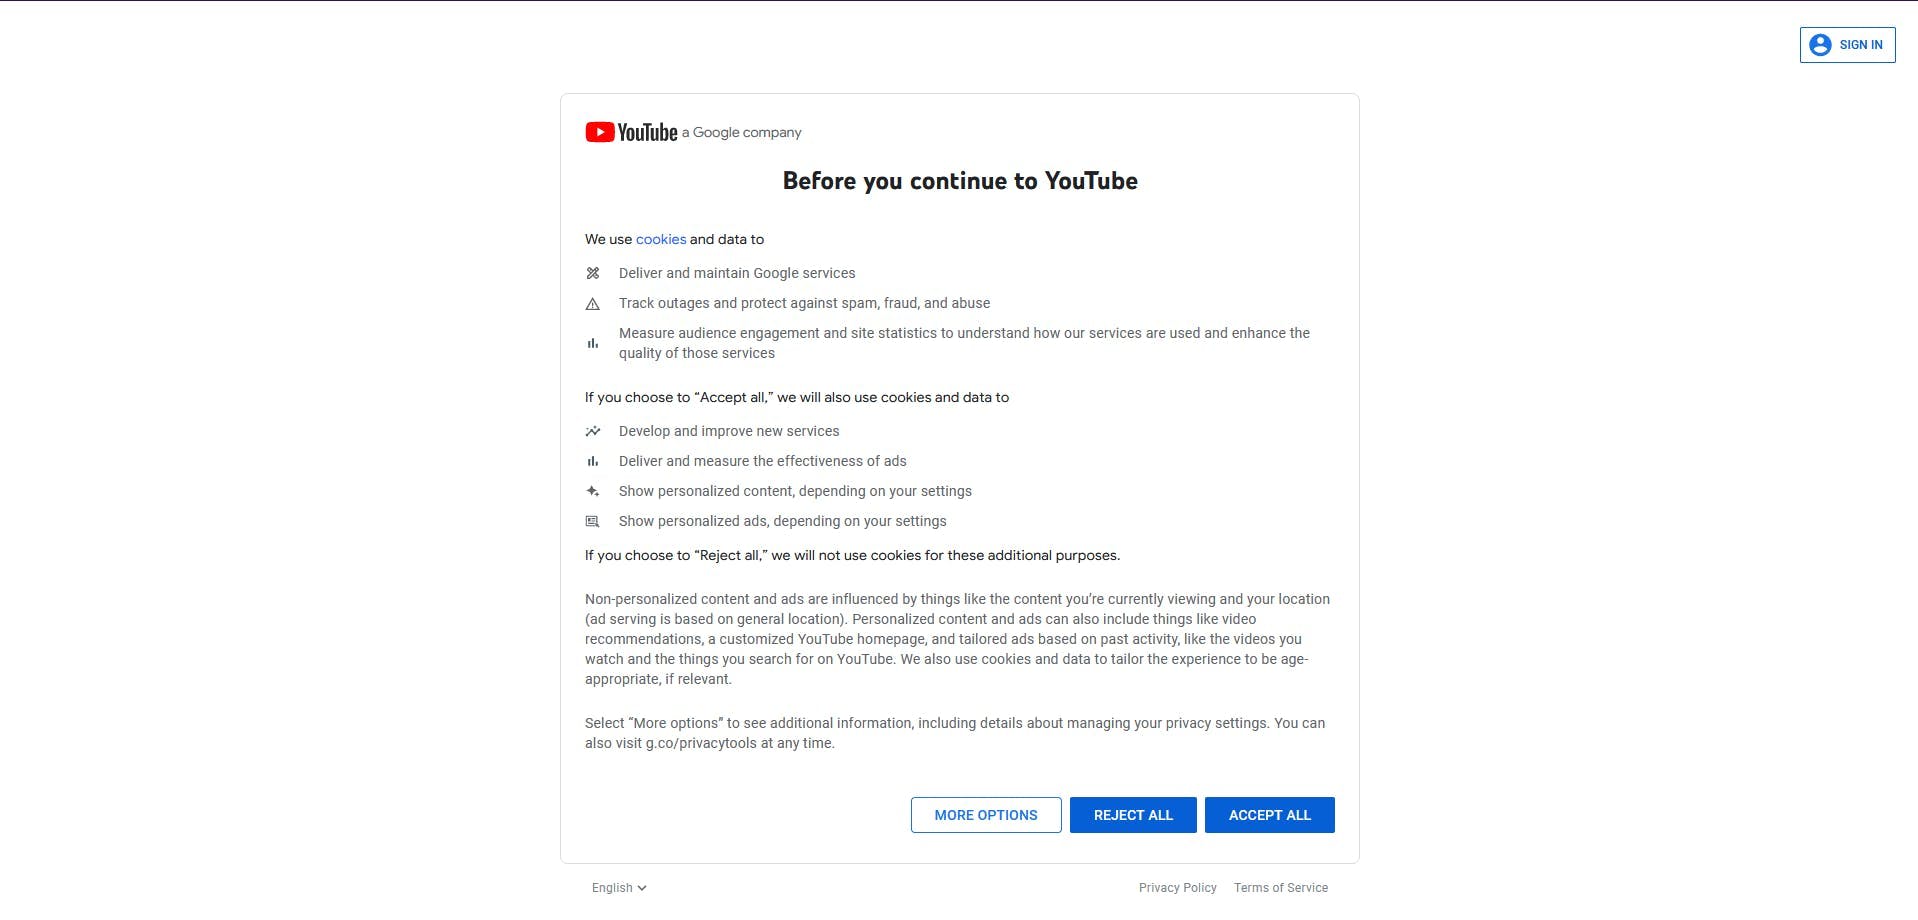
Luckily, it’s visible within the viewport, so we can use the Developer Tools to find its identifier and click on it.
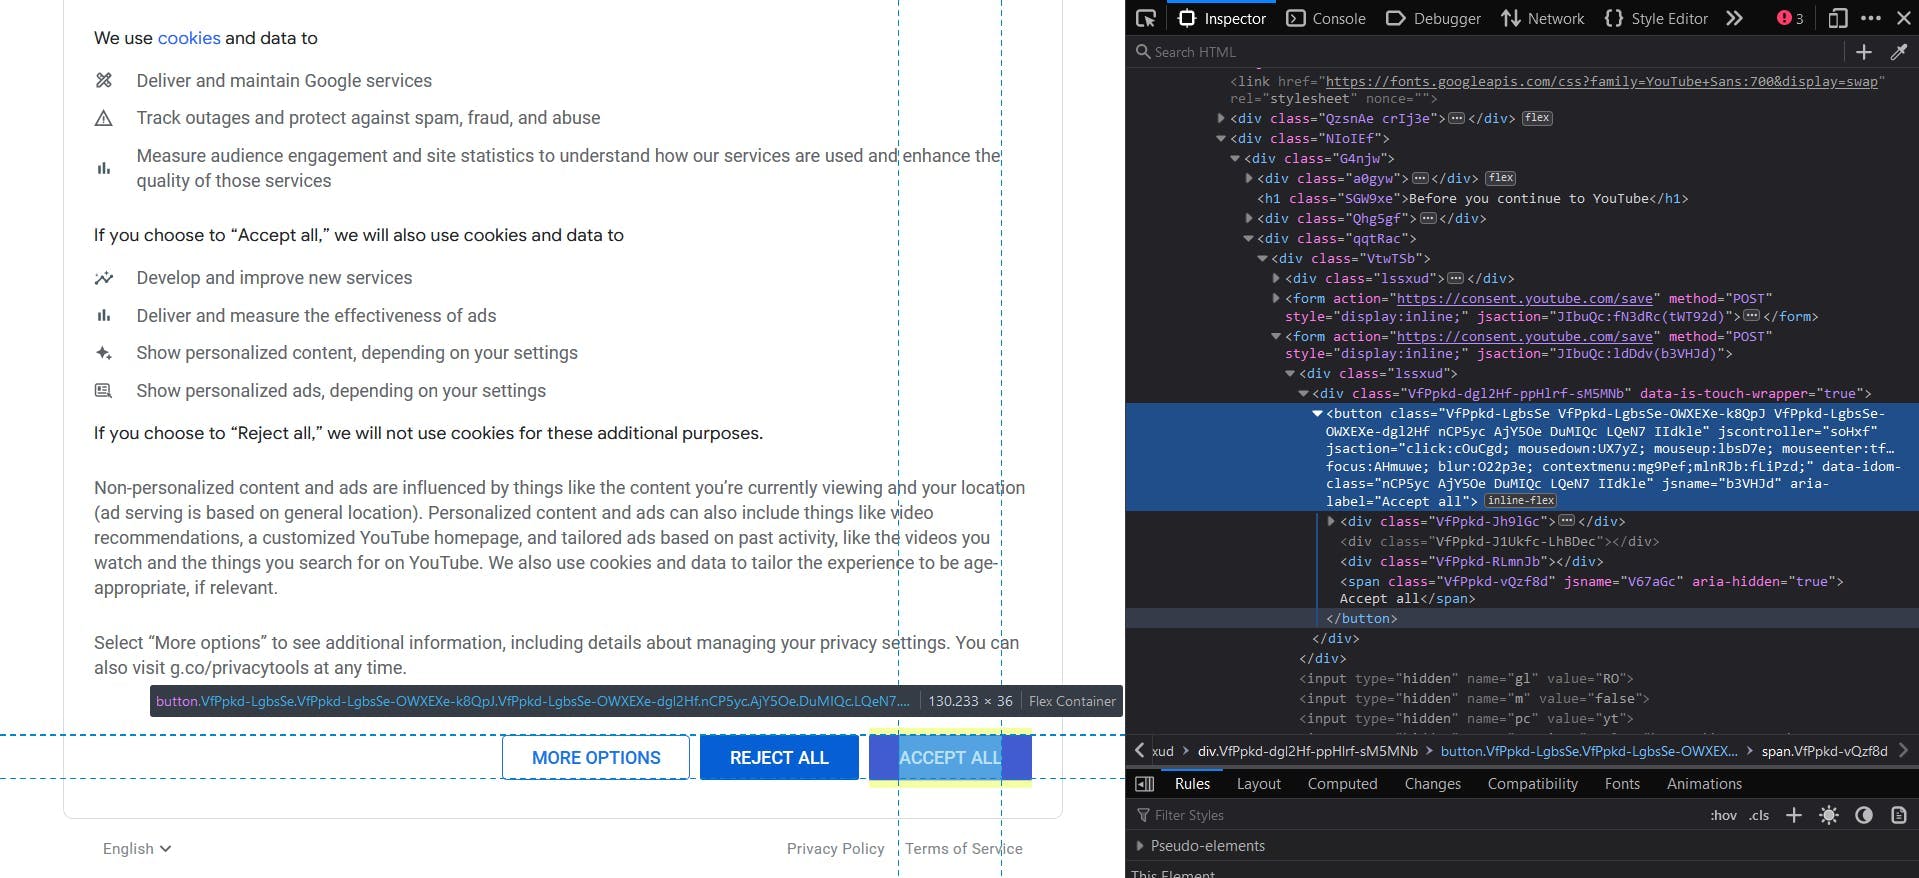
We also add an extra waiting time so we let the navigation complete. The code will look like this:
await page.waitForSelector('button[aria-label="Accept all"]')

await page.click('button[aria-label="Accept all"]')

await page.waitForTimeout(10 * 1000)
Channel info
In the screenshot below we can see highlighted the sections that contain the channel data that we want to extract.
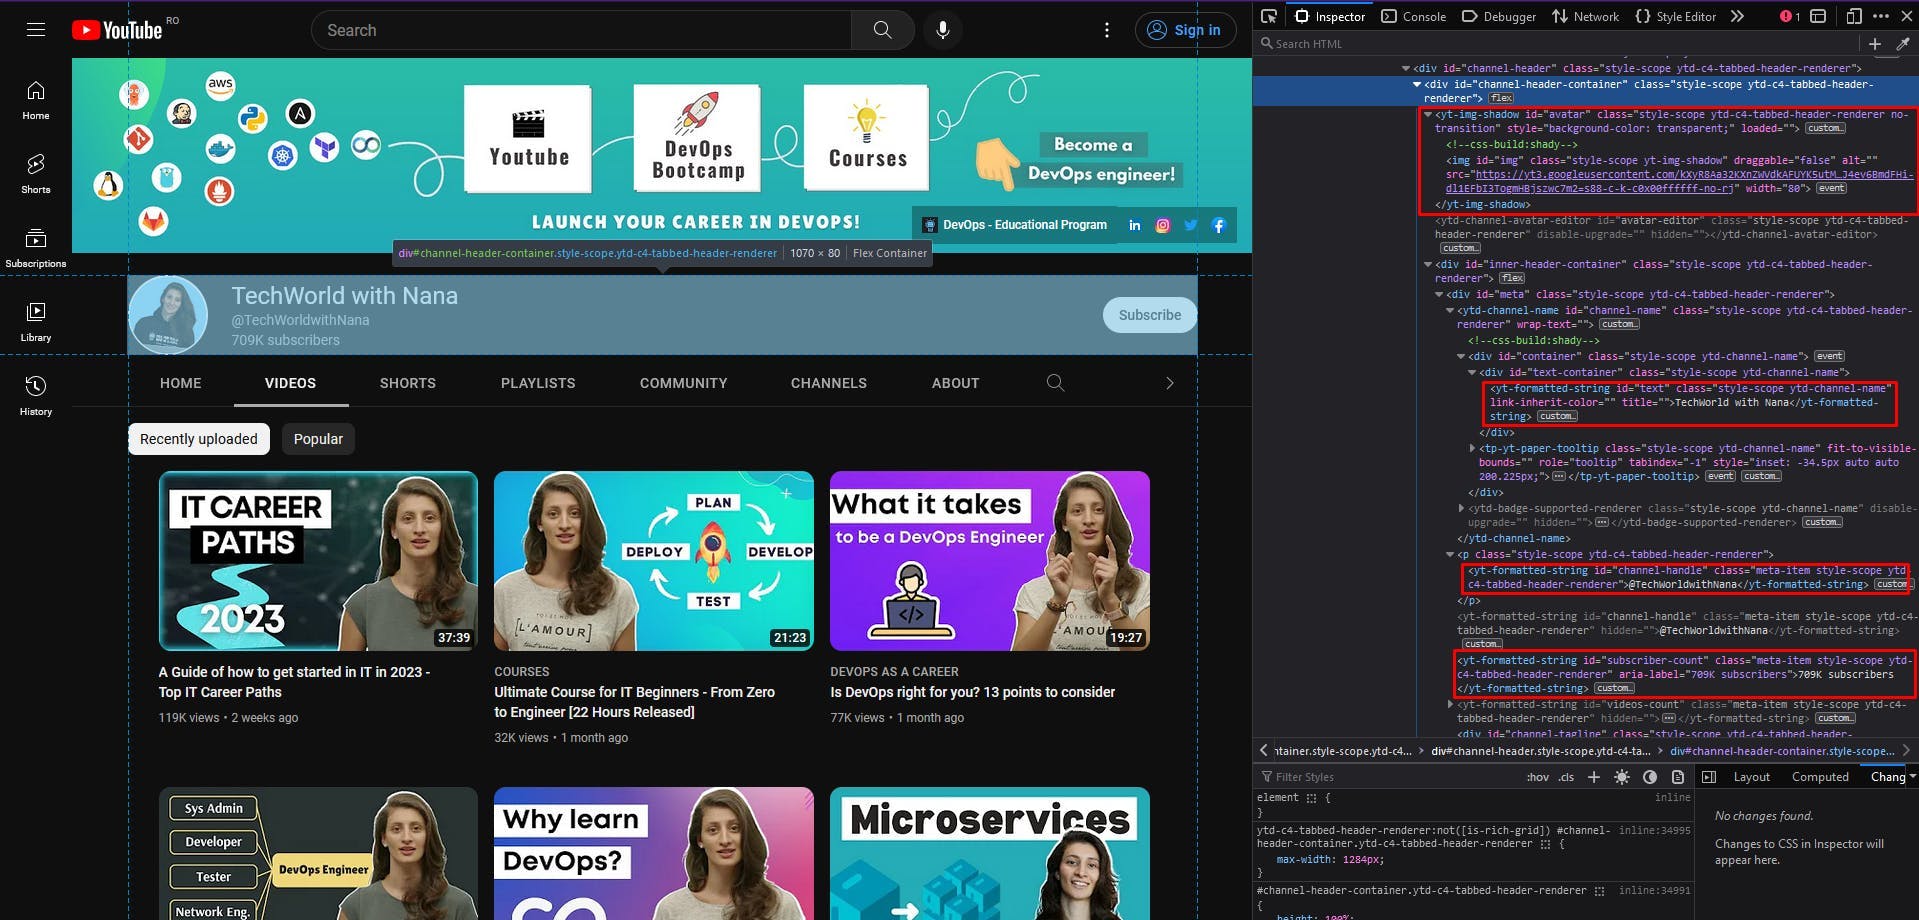
A good rule of thumb for easy localization of the HTML elements is to choose unique CSS selectors. For example, to extract the channel avatar, I will choose the custom HTML element yt-img-shadow with the id avatar. Then extract the src attribute of its img child element.
const channelAvatar = await page.evaluate(() => {

    const el = document.querySelector('yt-img-shadow#avatar > img');

    return el ? el.getAttribute('src') : null;

});
console.log(channelAvatar)
For the channel name, we have the text content of the element yt-formatted-string with the id text.
const channelName = await page.evaluate(() => {

    const el = document.querySelector('yt-formatted-string#text');

    return el ? el.textContent : null;

});

console.log(channelName)
To get the channel handle, we will locate the element yt-formatted-string with the id channel-handle and extract its text content.
const channelHandle = await page.evaluate(() => {

    const el = document.querySelector('yt-formatted-string#channel-handle');

    return el ? el.textContent : null;

});

console.log(channelHandle)
And finally, for the number of channel subscribers, we just have to access the element yt-formatted-string with the id subscriber-count and get its text content.
const subscriberCount = await page.evaluate(() => {

    const el = document.querySelector('yt-formatted-string#subscriber-count');

    return el ? el.textContent : null;

});

console.log(subscriberCount)
By running the script again, you should see the following output:
https://yt3.googleusercontent.com/kXyR8Aa32KXnZWVdkAFUYK5utM752kSJPHGtYiJ4ev6BmdFHi-dl1EFbI3TogmHBjszwc7m2=s176-c-k-c0x00ffffff-no-rj

TechWorld with Nana

@TechWorldwithNana

709K subscribers
Video data
Moving forward to the video data, I also highlighted the relevant sections of the HTML document. Here, we should extract a list of elements, so we look at the parent containers first and then iterate through each one of them.
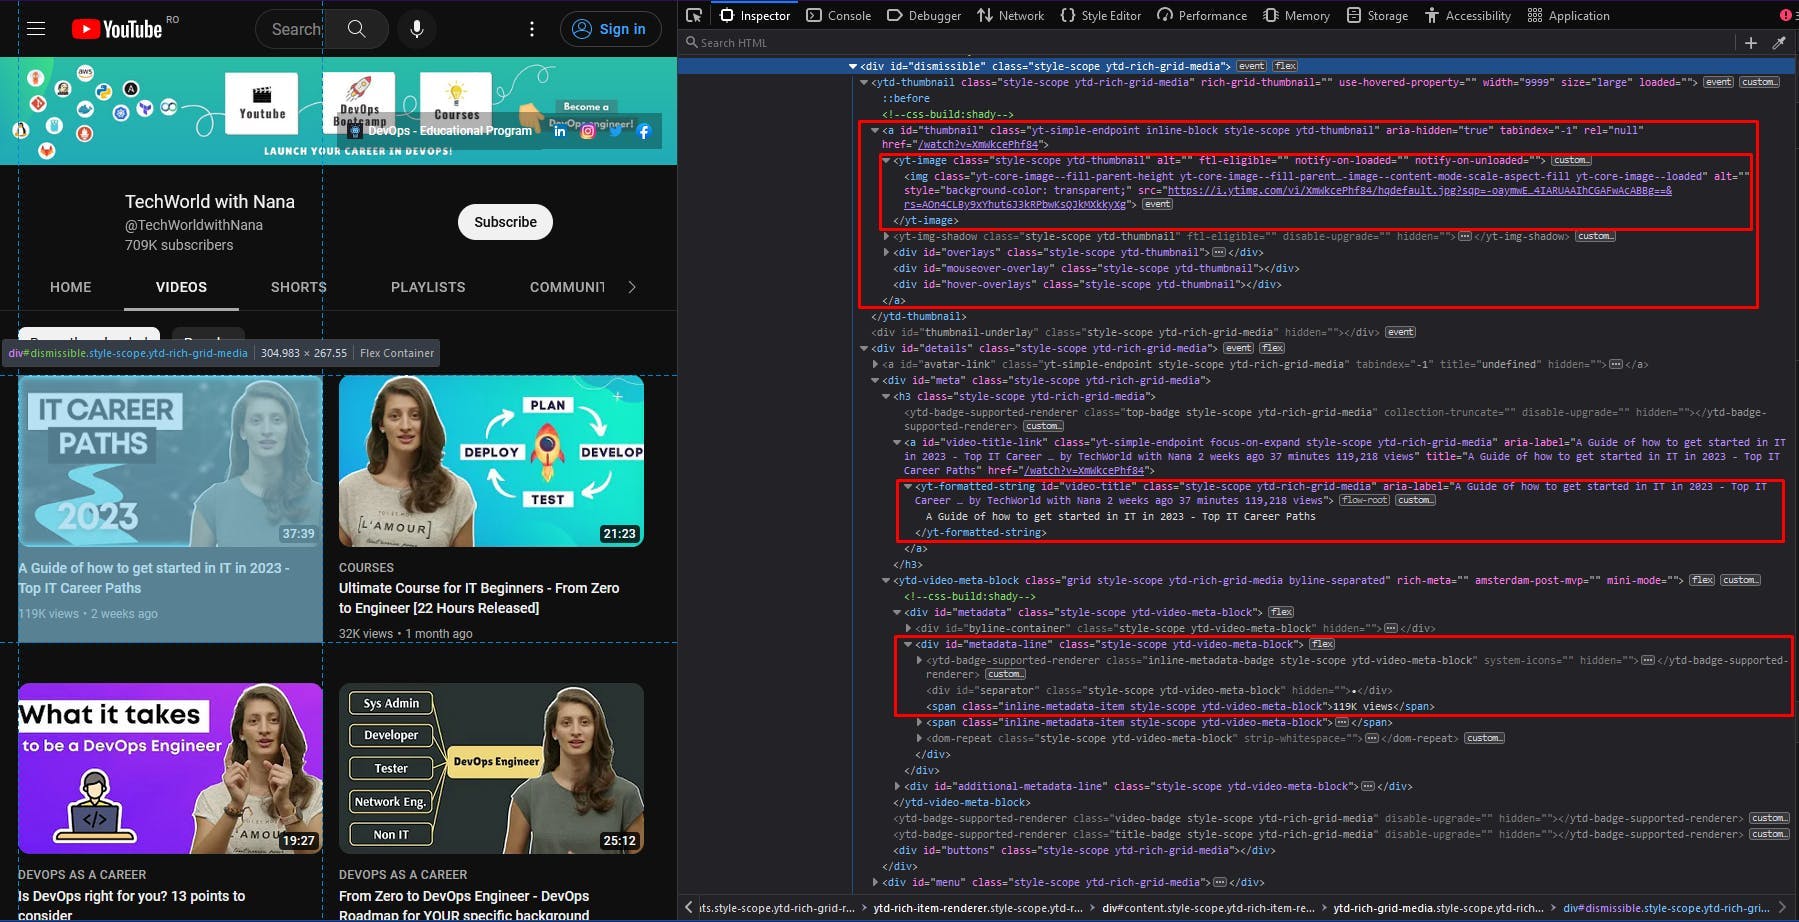
We follow the same approach from the previous section: choosing some unique CSS selectors to locate the data we need, with a focus on their ids. The code should look something like this:
const videos = await page.evaluate(() => {

    const videosEls = Array.from(document.querySelectorAll('div#dismissible'))

    return videosEls.map(video => {

        const titleEl = video.querySelector('yt-formatted-string#video-title');

        const viewsEl = video.querySelector('div#metadata-line > span');

        const thumbnailEl = video.querySelector('yt-image.ytd-thumbnail > img');

        const locationEl = video.querySelector('a#thumbnail');

        return {

            title: titleEl ? titleEl.textContent : null,

            views: viewsEl ? viewsEl.textContent : null,

            thumbnail: thumbnailEl ? thumbnailEl.getAttribute('src') : null,

            location: locationEl ? locationEl.getAttribute('href') : null

        }

    })

})

console.log(videos)
When you run the code, the output should be a list of Javascript objects. Each one of them should contain the title, the number of views, the thumbnail, and the location of every video element on the page.
However, you’ll notice that after one point, your list starts looking like this:
{

    title: 'GitLab CI/CD Full Course released - CI/CD with Docker | K8s | Microservices!',

    views: '114K views',

    thumbnail: null,

    location: '/watch?v=F7WMRXLUQRM'

},

{

    title: 'Kubernetes Security Best Practices you need to know | THE Guide for securing your K8s cluster!',

    views: '103K views',

    thumbnail: null,

    location: '/watch?v=oBf5lrmquYI'

},

{

    title: 'How I learn new technologies as a DevOps Engineer (without being overwhelmed)',

    views: '366K views',

    thumbnail: null,

    location: '/watch?v=Cthla7KqU04'

},

{

    title: 'Automate your Multi-Stage Continuous Delivery and Operations | with Keptn',

    views: '59K views',

    thumbnail: null,

    location: '/watch?v=3EEZmSwMXp8'

},
Although the video elements still have a thumbnail and the CSS selector didn’t change, the extracted value is null. This usually happens when a website implements lazy loading, meaning that the rest of the list is loaded as you scroll to the bottom of the page.
To solve this problem, we have to simply instruct our script to scroll down the channel page.
async function autoScroll(page: any, scroll_number: number): Promise<any> {

    await page.evaluate(async (scroll_number: number) => {

        await new Promise((resolve) => {

            let totalHeight = 0;

        	const timer = setInterval(() => {

                const scrollHeight = window.innerHeight * scroll_number;

                window.scrollBy(0, window.innerHeight);

                totalHeight += window.innerHeight;

                if (totalHeight > scrollHeight) {

                    clearInterval(timer);

                	  resolve(true);

                }

        	}, 1000);

    	  });

    }, scroll_number);

}
This function takes as parameters our opened page and a number of scroll movements. Then attempts to scroll the distance equal to the window height that many times that the scroll_number parameter instructs it to. These movements are performed every 1 second.
Now simply call the function before the code snippet that extracts the list of videos.
await autoScroll(page, 10)

await page.waitForTimeout(2 * 1000)
I added an additional waiting time of 2 seconds so the website has time to fully load the final elements of the list. By running the script again, you will first be able to see how the scroll movements happen and then that all the elements in the list have a thumbnail value.
Avoid getting blocked
Even though the guide until this point seemed effortless, there are multiple challenges that web scrapers usually encounter. YouTube in particular implements many antibot techniques to prevent automated scripts from extracting its data.
Some of these techniques are:
- CAPTCHAs: solving CAPTCHAs can be time-consuming and difficult for a scraper, which can serve as a deterrent for bots.
- JavaScript challenges: they may include tasks like solving math problems, completing a CAPTCHA, or finding a specific element on the page. A bot that is unable to complete the challenge will be detected and potentially blocked.
- User-Agent checks: YouTube may check the user-agent string of incoming requests to see if they are coming from a browser or a scraper. If the user agent string is not recognized as a valid browser, the request may be blocked.
- IP blocking: YouTube may block requests from certain IP addresses that are known to be associated with bots or scraping activity.
- Honeypots: YouTube may use honeypots, which are hidden elements on the page that are only visible to bots. If a bot is detected interacting with a honeypot, it can be identified and blocked.
Treating each one of these issues can significantly increase the complexity and the cost of your scraper code. This is where the scraping APIs play an important role, as they handle these problems by default and are available at a lower price.
WebScrapingAPI is an example of such a service. It offers powerful features to avoid bot detection techniques and accurately extract the data you need.
We can quickly try using WebScrapingAPI by installing the Node.js SDK in our little project:
npm i webscrapingapi
Now check out the homepage to register an account, which will automatically give you your API key and a Free Trial. The API key can be found on the dashboard, and you will use it to authenticate your requests to the API:
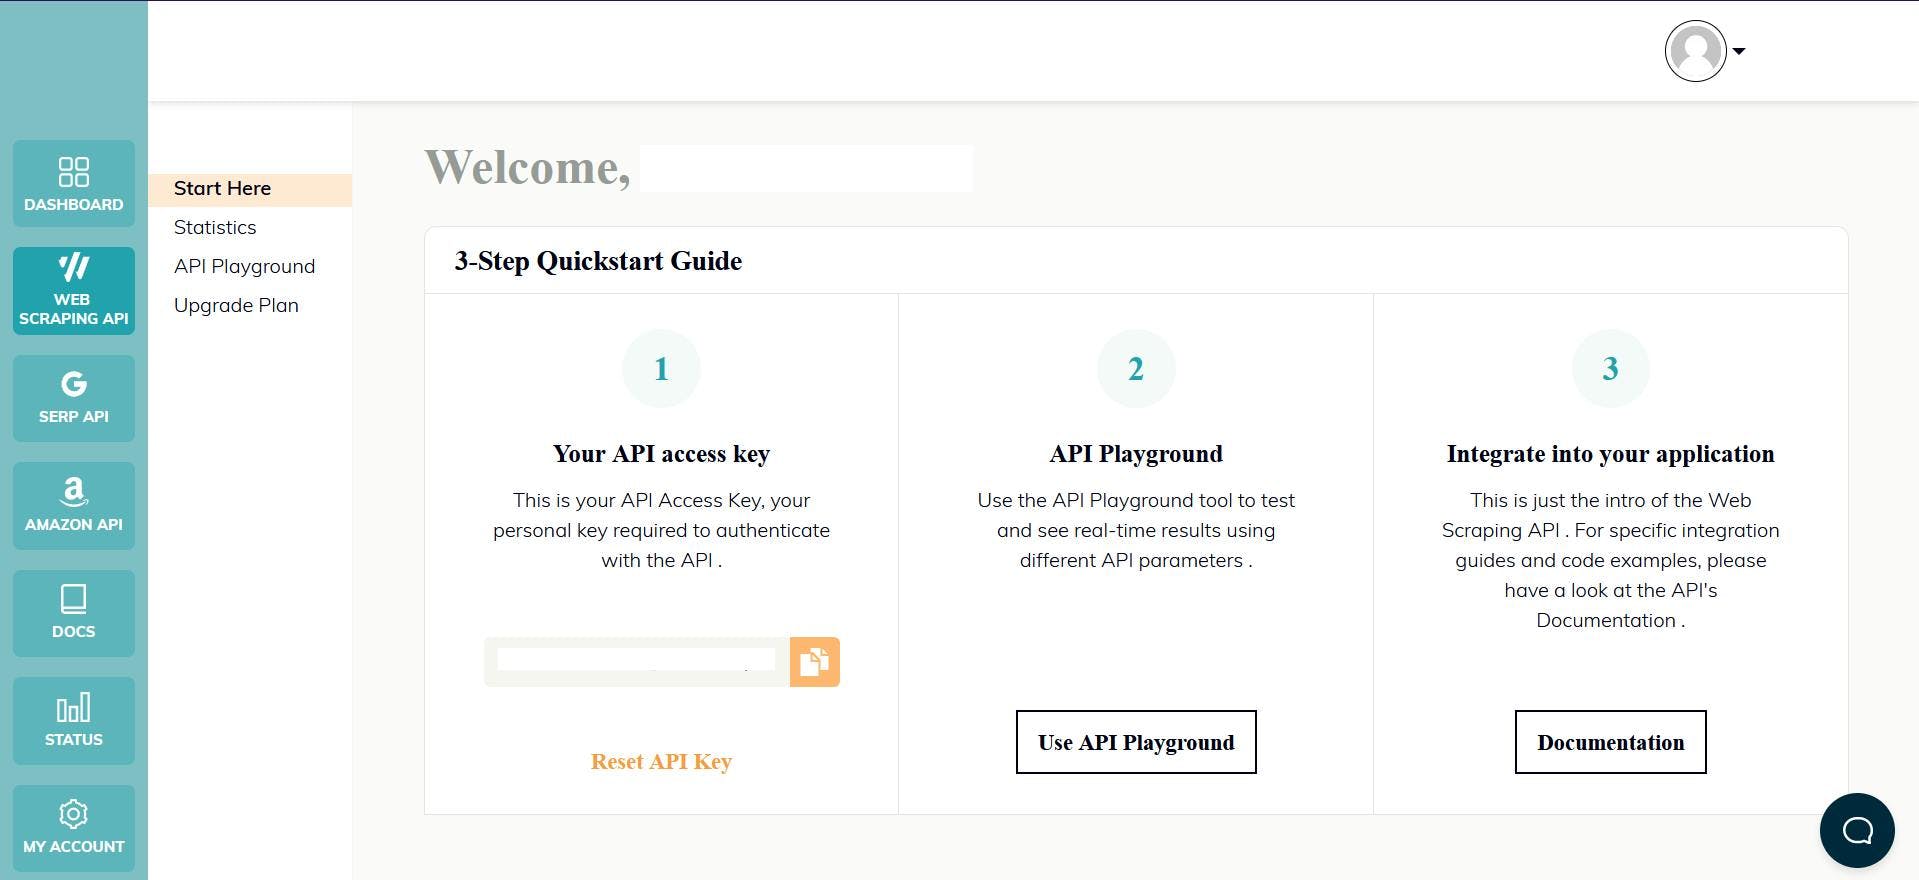
And that’s all, you can start coding!
import webScrapingApiClient from 'webscrapingapi';

const client = new webScrapingApiClient("YOUR_API_KEY");

async function exampleUsage(target_url: string) {

    const api_params = {

        'render_js': 1,

    	  'proxy_type': 'datacenter',

    	  'country': 'us',

    	  'timeout': 60000,

    	  'js_instructions': JSON.stringify([

            {

                action: "click",

                selector: 'button[aria-label="Accept all"]',

                timeout: 10000

         	}

    	  ]),

    	  'extract_rules': JSON.stringify({

        	avatar: {

                selector: "yt-img-shadow#avatar > img",

                output: "@src",

        	},

        	name: {

                selector: "yt-formatted-string#text",

                output: "text",

        	},

        	handle: {

                selector: "yt-formatted-string#channel-handle",

                output: "text",

        	},

        	subscribers: {

                selector: "yt-formatted-string#subscriber-count",

                output: "text",

        	},

        	videoTitles: {

                selector: "yt-formatted-string#video-title",

                output: "text",

                all: "1"

        	},

        	videoViews: {

                selector: "div#metadata-line > span",

                output: "text",

                all: "1"

        	},

        	videoThumbnails: {

                selector: "yt-image.ytd-thumbnail > img",

                output: "@src",

                all: "1"

        	},

        	videoLocations: {

                selector: "a#thumbnail",

                output: "@href",

                all: "1"

        	},

        })

    }

    const response = await client.get(target_url, api_params);

    if (response.success) {

        console.log(response.response.data);

    } else {

        console.log(response.error.response.data);

    }

}

exampleUsage("https://www.youtube.com/@TechWorldwithNana/videos");
We translated the algorithm and the CSS selectors described before to the API. The “js_instructions” parameter will handle the cookie window, by clicking the "Accept All" button. Finally, the“extract_rules” parameter will handle the data extraction.
const scroll_number = 10

let scroll_index = 0

for (let i = 0; i < scroll_number; i++) {

    const js_instructions_obj = JSON.parse(api_params.js_instructions)

    js_instructions_obj.push({

        action: "scrollTo",

        selector: `ytd-rich-grid-row.ytd-rich-grid-renderer:nth-child(${scroll_index + 3})`,

        block: "end",

     	  timeout: 1000

    })

    api_params.js_instructions = JSON.stringify(js_instructions_obj)

    scroll_index += 3

}
Then right before sending the request, remember to also adjust the scroll logic. This will be slightly different, as we instruct the API to scroll to the third row of videos 10 times.
Conclusion
In this article, we've explored the exciting field of web scraping and learned how to scrape data from YouTube using Node.js and Puppeteer. We've covered the necessary setup for web scraping, as well as the process of extracting data from YouTube channels.
Web scraping can be an incredibly useful tool for accessing data from websites. Yet, it's important to keep in mind the various challenges and considerations that come with it. These can include CAPTCHAs, dynamic content, rate limiting, or website changes.
If you're thinking of scraping data from YouTube or any other website, it's essential to weigh the pros and cons and determine whether web scraping is the best solution for your needs. In some cases, using an API or purchasing data from a reputable source may be a more suitable option than scraping.
No matter what approach you choose, it's crucial to respect the terms of service and copyright laws that apply to the data you're accessing. And if you do decide to scrape data from YouTube, remember to use a professional scraper to ensure that you're getting accurate, up-to-date data in a secure and efficient manner.
I hope this article has been helpful as you embark on your journey to learn about web scraping and how to scrape YouTube data!
News and updates
Stay up-to-date with the latest web scraping guides and news by subscribing to our newsletter.
We care about the protection of your data. Read our Privacy Policy.

Related articles
Effortlessly gather real-time data from search engines using the SERP Scraping API. Enhance market analysis, SEO, and topic research with ease. Get started today!


Explore the complexities of scraping Amazon product data with our in-depth guide. From best practices and tools like Amazon Scraper API to legal considerations, learn how to navigate challenges, bypass CAPTCHAs, and efficiently extract valuable insights.

Explore the transformative power of web scraping in the finance sector. From product data to sentiment analysis, this guide offers insights into the various types of web data available for investment decisions.
